
Sensation Testing for Patient with Central Nervous System Lesion
Returning home for holidays, I discovered some university notes regarding sensation testing, and the differences between central and peripheral nervous system testing. I often perform upper limb and lower limb neurology testing but rarely perform such a comprehensive assessment of various forms of sensation. This provides a comprehensive overview of sensation testing for a central lesion, with peripheral testing being described in a later blog post.
Sensation Testing Procedures
Sensory testing procedures assume a patient can reliably report a sensory stimulus, for some with severe impairments of verbal communication or cognition this is not possible. A modified procedure attempting to localise light touch should be performed in this case. However, if the patient does not understand the instructions, you will not be able to perform a reliable assessment. Although a similar procedure is followed, some differences occur between a central or peripheral nerve lesion. A central lesion will display a more patchy sensory distribution than a spinal cord level or peripheral nerve lesion.
Equipment & Set-up
- For all sensory assessment procedures test the affected side/area first then the unaffected side. This prevents the retained memory of the last stimulus compromising testing.
- Patient Position - supported long sitting, ensure the lower limb is exposed to the hip joint and upper limb exposed to acromion, trunk must be exposed for area tested.
- Equipment Required - cotton wool/tissue, 2 paper clips, test tubes filled with hot/cold water
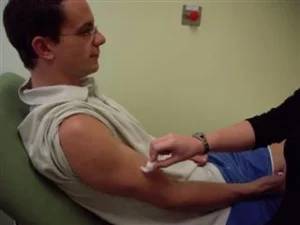
1) Testing Discrimination of Light Touch
a) Ability to Localise
Explanation to the Patient
Explain procedure in general terms, including purpose of assessment. "I am going to test the feeling in your arm/leg/trunk, let me know what you feel."
Testing Procedure
- Commence testing in area of suspected impaired sensation.
- Start distally in arm/leg, in a random sequence lightly but rapidly stroke a small area of patient's skin on different surfaces using a cotton bud or tissue, use equal pressure throughout all tests.
- After each stroke await a response from patient without prompting them.
- If the patient responds, ask them what it feels like and where (patient to point to location).
- Ensure when changing surfaces (and moving the limb for better access) you use as little manual handling as possible to reduce sensation learning.
- Once you have assessed the affected side move to unaffected side & repeat.
- Then alternate between left and right sides in a random sequence.
- Documentation should include either a pictorial representation or a detailed description of the absent sensation. My preference is a pictorial representation of the limb/body part being tested.
b) Testing Between Areas for Diminished/Altered Sensation
Explanation to the Patient
- "I will now test if any areas feel different than others" (indicates all types of sensations).
- "I will touch one area of skin then immediately touch another area".
- "I need you to tell me how one area feels compared to another".
- "You may keep your eyes open".
- During testing, I continually say "does that feel the same as that?"
Testing Procedure
- In a systematic way, moving from distal to proximal on all surfaces, lightly stroke one area immediately followed by another area (either the same region on the opposite side, or another area on the same side).
- Ask the patient what they feel, or "does that feel the same as that?"
2) SHARP/BLUNT DISCRIMINATION
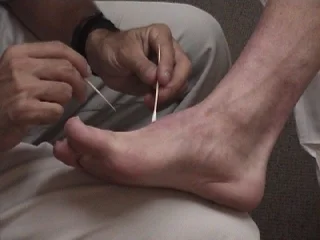
Picture uses toothpick andcotton bud, I prefer an opened paper clip
Often used to clarify borders of sensory impairment, although can be used to isolate specific spinal sensory pathways.
Explanation to the Patient
"I am going to further test the feeling in your arm/leg" ... and ... "I'm going to use a paper clip, I want you to tell me what you feel".
Demonstrate on an area with intact sensation the difference between a sharp and blunt sensation.
Testing Procedures
- Start distally in the affected limb, randomly alternating sharp or blunt pressure, using equal pressure throughout the limb.
- After each stimulus await a response without prompting.
- Test affected then unaffected sides, then alternate between sides in a random sequence.
- Note the number of correct responses, and any areas where the patient consistently reported the wrong response.
- Documentation should include the area and the number of correct responses (e.g. left hand palmar surface 4/10).
3) Two Point Discrimination (optional)
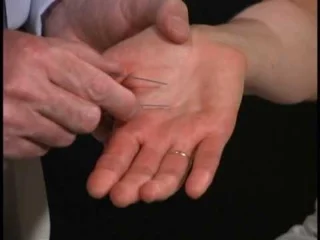
May be used as further clarification, but clinically not important to include in all circumstances. May be usual in patients with central sensitisation.
Explanation to the Patient
"I'm going to use 2 paper clips, I want you to let me know whether you feel one or two points of pressure, please close your eyes".
Testing Procedures
- Start in the area where the patient had difficulties in sharp/blunt discrimination & using equal pressure on both paper clips touch them 4 to 5cm apart.
- Ask the patient if they feel one or two points of pressure.
- Gradually lift & move the points closer together, each time asking if the patient feels one or two points.
- Keep moving them closer until the patients reports feeling one point.
- Repeat at various spots in that area, documenting the distance between the two points.
- NB: it is normal to have differences at different parts of the body, however it is important to note where responses are different between sides.
4) Bilateral Simultaneous Stimulation
Testing for a perceptual deficit of sensory neglect, only to be used for relevant conditions where there might be a sensory neglect (e.g. stroke or head injury), could possibly be used for persistent pain conditions with either hypervigilance or an apparent neglect
Explanation to the Patient
- "I'm going to compare the feeling between left and right sides".
- "I'm going to use cotton wool and either touch your right arm/leg, left arm/leg or both sides at once".
- "I want you to respond with either 'right', 'left' or 'both' depending on what you feel".
- "Please close your eyes".
Testing Procedures
- On a part of the limb with intact sensation in both sides, lightly stroke the patient's left side, then right side then both sides.
- Pause after each stimulus & ask for a response.
- NB: If a patient is able to discriminate left and right sides but responds with only one side when both are simulated, the patient has a sensory neglect for the side they consistently ignore.
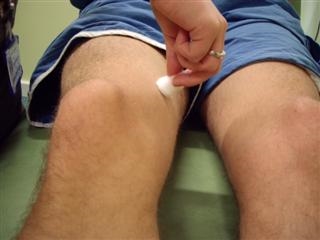
5) Hot/Cold (Temperature) Discrimination
Explanation to the Patient
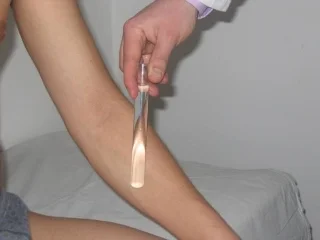
- "I'm going to test if you can tell hot from cold".
- "I'm going to fill one tube with hot, one tube with cold water then I want you to tell me if they feel hot or cold".
- Demonstrate on an area of skin with intact sensation, the feeling of hot compared to cold.
- "Please close your eyes".
Testing Procedures
- Start distally in the arm/leg & in a random sequence alternate between hot and cold test tubes with firm pressure for a short, equal period of time.
- Pause after each stimulus awaiting response without prompting.
- Alternate between different surfaces in a random sequence.
- Note the number of correct responses & if there's any areas with consistently wrong responses.
6) Testing Kinaesthesia
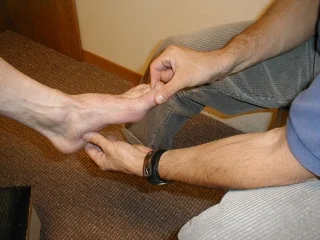
Comprised of joint movement sense and joint position sense, patient in supported long sitting. For lower limb, ensure the knee, ankle and foot are exposed and clothing loose enough to allow free movement. For upper limb, ensure elbow, wrist and hand are exposed.
a) Joint Movement Sense
Explanation to the Patient
- "I'm going to test if you can feel when your joint is moving, without looking at it".
- "I'm going to move your big toe/thumb, I want you to tell me when it's moving".
- Demonstrate the movement on the MTPJ of the thumb or big toe (flexion/extension).
- "Please close your eyes".
Testing Procedures
- Use a light grip on the medial & lateral aspects of the proximal phalynx, to avoid giving extra sensory cues to patient.
- Slowly move the toe/thumb into random increments of flexion/extension.
- Briefly pause between movements, if there's no response, remind the patient you want them to respond when they feel movement.
- Note if the responses are consistently correct, if so progress to joint position sense.
- Test ankle/wrist, knee/elbow & hip/shoulder in the same manner, only one plane of movement needs to be assessed for each joint.
b) Joint Position Sense
Explanation to the Patient
- "I know you can tell if your joint is moving, now I want to test if you know which direction the joint is moving".
- "I want you to tell me which way the joint is moving, up or down (up=flex, down = extension etc)".
- Demonstrate the movement on the MTPJ of the thumb or big toe (flexion/extension), explaining which direction is up/down.
- "Please close your eyes".
Testing Procedures
- Use the same handling as the previous test.
- Slowly move the thumb/toe into flexion/extension.
- Briefly pause between movements, "is that moving up or down?"
- Test ankle/wrist, knee/elbow & hip/shoulder in the same manner, only one plane of movement needs to be assessed for each joint.
- NB: For larger joints, move one joint and get the patient to copy the position with their opposite limb (e.g. move right knee into 90 degrees flexion, patient moves left knee)
This should provide a clinical resource on assessing sensation, in a patient with a suspected or confirmed central nervous system lesion. For further information, please refer to the references below.
Alicia
References:
Adams RD, Victor M and Ropper MD (2001): Principles of Neurology (7th ed.) New York: McGraw Hill. (Chapter 3 & 9).
Fredericks C and Saladin L (1996): Pathophysiology of the Motor Systems: Principles and Clinical Presentations. Philadelphia: F.A Davis pp. 275 - 288.
Kingsley R.E (2000): Concise Text of Neuroscience. (2nd ed.) Philadelphia: Lippincott, Williams & Wilkins. (Chapter 6, Appendix 2).
Nolte J (1999): The Human Brain: An Introduction to its Functional Anatomy. (4th ed.) St Louis: Mosby Year Book. (Chapter 10).
Nolte J and Angevine JB (1995): The Human Brain in Photographs and Diagrams. (1st ed.) St Louis: Mosby Year Book Inc.